Streamlit で簡単にウェブアプリをつくる(その1)
Streamlit で Open AI API を使いデモをつくります。 Open AI API への対応はその2でやることにして、 今回は Streamlit で最低限のウェブインタフェースをつくるところまで進めます。
環境
python のバージョン:
$ python --version
Python 3.9.17
pyenv のバージョン:
$ pyenv --version
pyenv 2.3.23-2-gac5efed3
pyenv をどうやってインストールしたか忘れた。 必要になったらインストール方法を書く。
Srreamlit 専用の環境を pyenv でつくる
$ python -m venv ~/.local/venv-novelgen
$ source ~/.local/venv-novelgen/bin/activate
( venv-novelgen ) $
Streamlit のアプリを書く
( venv-novelgen ) $ touch app.py
app.py の内容:
import streamlit as st

def view():
	st.title("NovelGen")

	q_input = st.text_input(
		"Prompt:",
		placeholder="Novel Prompt here...")

view()
早速、 実行する。
( venv-novelgen ) $ streamlit run app.py

Collecting usage statistics. To deactivate, set browser.gatherUsageStats to false.


  You can now view your Streamlit app in your browser.

    Local URL: http://localhost:8501
	Network URL: http://192.168.10.xxx:8501
	External URL: http://xxx.xxx.xxx.xxx:8501
コンソールに出たURLを使って ブラウザでアプリを開く。
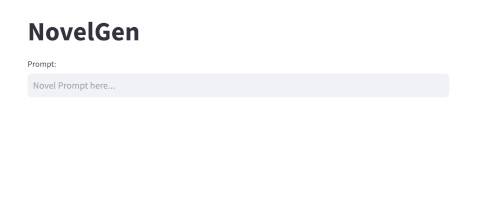
もうできている!!
UI部品を書き足していく
まだ書いてほしい小説のイメージを伝えるためのプロンプト入力欄(テキストフィールド)を用意しただけなので、 ここに Send ボタンと Reset ボタンと結果の小説文を表示するコンテナを追加します。
# app.py 抜粋

...

	q_input = st.text_input(
		"Prompt:",
		placeholder="Novel Prompt here...")

	c_button_send = st.empty()
	c_button_reset = st.empty()
	c_result = st.container()

...
q_input の下に続けて c_button_send と c_button_reset と c_result を追加した。
それはは、 実行する streamlit run app.py そしてブラウザで確認。
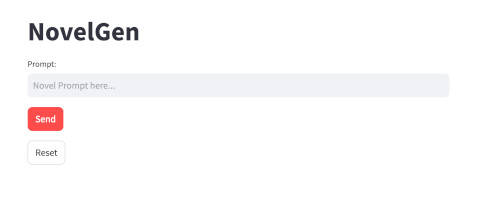
縦方向に記述した順にUIコンポーネントが並ぶらしい。
アクションに対応する
あとは、Send や Reset ボタンをクリックしたときに起こすアクションを定義していきます。
事前準備として、OpenAI API の 文章生成部分を担当するダミーの関数を定義します。
def generateNovelContent(prompt):
	return "Hello, NovelGen! " + prompt
プロンプトを渡して結果の小説文を返す関数です。 もっとも今はダミーなので適当な文字列を返すだけです。
ではそれぞれのボタンの名前とタイプそしてクリックに対するアクションを定義する。
	if c_button_send.button("Send", type="primary"):
		a = generateNovelContent(q_input)
		c_result.write( a )

	if c_button_reset.button("Reset"):
		c_result.write("")
公式説明 ボタン https://docs.streamlit.io/develop/concepts/design/buttons
この記述方法は気にくわないのだが、公式のボタン定義の説明もこういう感じになっているので、 とりあえずこの記述方法でいく。 次のように書くこともできるのだが、このように action を別関数として定義すると、 記述がややこしくなっていくので、いったんあきらめる。
c_button_send.button("Send", type="primary", on_click=send_button_action)
「むかしむかし」とプロンプト入力欄に入れて、 Send ボタンをクリックしたところ:
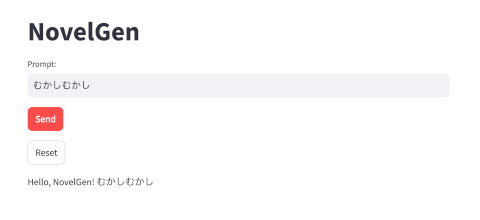
できました。
ボタンの位置を変更
縦にボタンが並んでいるのをやめて、テキストフィールドの右側に配置したい。
参考:
st.columns を使って3列つくり、 [7,1,1] でそれぞれの列幅配分を指定します。
# app.py 抜粋

...

	col0, col1, col2 = st.columns([7,1,1])
	with col0:
		q_input = st.text_input(
		        "Prompt:",
		  	placeholder="Novel Prompt here...")
	with col1:
		c_button_send = st.empty()
	with col2:
		c_button_reset = st.empty()

...
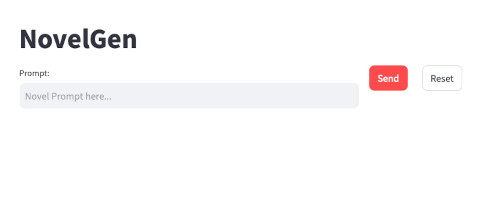
できるにはできたのですが、 横に並んだ3つのコンポーネントの縦の位置あわせが気にくわない。 この並び位置を解決するには vertical_alignment オプションを使う。 これに top,center,bottom のいずれかを渡して調整できる。 ここでは、ボトムに合わせればちょうど良さそう。だから bottom を指定。
オフィシャルドキュメント:
他にも gap オプションが使える。
col0, col1, col2 = st.columns([7,1,1], vertical_alignment="bottom")
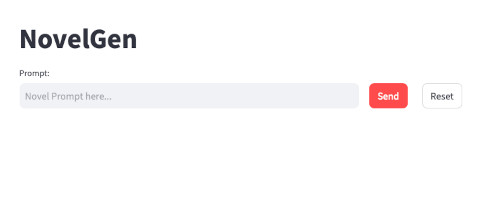
ボトムに揃えたらいい感じになりました。
まとめ
完成したコード全体を掲載。
app.py
import streamlit as st

def generateNovelContent(prompt):
	return "Hello, NovelGen! " + prompt

def view():
	st.title("NovelGen")
	col0, col1, col2 = st.columns([7,1,1], vertical_alignment="bottom")
	with col0:
		q_input = st.text_input("Prompt:", placeholder="Novel Prompt here...")
	with col1:
		c_button_send = st.empty()
	with col2:
		c_button_reset = st.empty()

	c_result = st.container()

	if c_button_send.button("Send", type="primary"):
		a = generateNovelContent(q_input)
		c_result.write( a )

	if c_button_reset.button("Reset"):
		c_result.write("")

view()
これで プロンプトを書いたらそのプロンプトを generateNovelContent 関数に投げて、結果を表示するところまで完成しました。
あとは、generateNovelContent の中身を Open AI API の ChatCompletion あたりを使って プロンプトから小説文を生成させるコードを記述すればいいはず。 その2に続く。