Qwen Image Edit 2511 再び 16GB VRAM で Q2_K から Q5_K まで試す
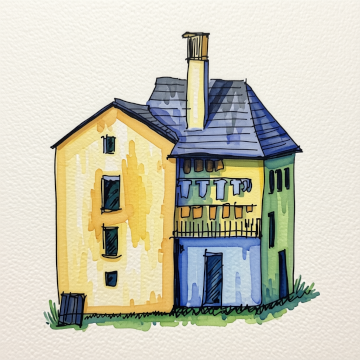
このポスト Qwen Image Edit 2511 を使って線画に着色 の続きです。 RTX 5060 ti 16GB VRAM を使う機会を得たので、Qwen Image Edit 量子化モデルどこまでいけるか試しました。 そのポストで使用していたコードを改良することで、 Q5_K_M を使って変換することができました。
Q2, Q3, Q4, Q5 それぞれの変換結果
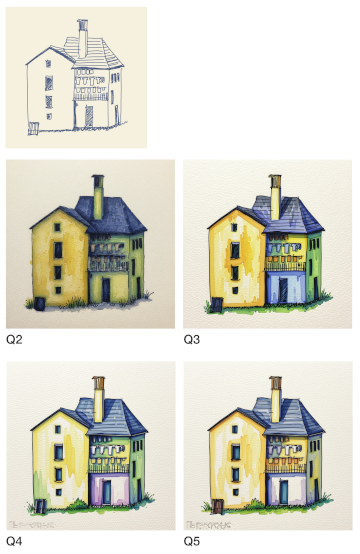
Q2, Q3, Q4, Q5 それぞれのモデルはこちらを参照:
改良版 img2img.py
事前準備は 以前のポスト Qwen Image Edit 2511 を使って線画に着色 と同じなので省きます。
import gc

import argparse
from dataclasses import dataclass

import torch
from PIL import Image
from diffusers import (
    GGUFQuantizationConfig,
    QwenImageTransformer2DModel,
    QwenImageEditPlusPipeline
)
from transformers import (
    BitsAndBytesConfig as TFBitsAndBytesConfig,
    Qwen2_5_VLForConditionalGeneration
)


def create_transformer(model_id: str, ckpt_path: str) -> QwenImageTransformer2DModel:
    return QwenImageTransformer2DModel.from_single_file(
        ckpt_path,
        quantization_config=GGUFQuantizationConfig(compute_dtype=torch.bfloat16),
        torch_dtype=torch.bfloat16,
        config=model_id,
        subfolder="transformer"
    )

def create_pipe(model_id):
    tf_quant_config = TFBitsAndBytesConfig(
        load_in_4bit=True,
        bnb_4bit_quant_type="nf4",
        bnb_4bit_compute_dtype=torch.bfloat16,
    )

    text_encoder = Qwen2_5_VLForConditionalGeneration.from_pretrained(
        model_id,
        subfolder="text_encoder",
        quantization_config=tf_quant_config,
        torch_dtype=torch.bfloat16,
    )

    # transformer なしでパイプラインを組み、先にエンコードだけ済ませる
    pipe = QwenImageEditPlusPipeline.from_pretrained(
        model_id,
        transformer=None,          # まだ載せない
        text_encoder=text_encoder,
        torch_dtype=torch.bfloat16,
    )
    pipe.text_encoder.to("cuda")

    return pipe


def precompute_embeds(pipe, prompt: str):
    with torch.no_grad():
        prompt_embeds, prompt_embeds_mask = pipe.encode_prompt(
            prompt=prompt,
            device="cuda",
        )
    return prompt_embeds, prompt_embeds_mask


def swap_to_transformer(pipe, transformer):
    # text_encoder をGPUから完全に追い出す
    pipe.text_encoder.to("cpu")
    del pipe.text_encoder
    gc.collect()

    torch.cuda.empty_cache()

    pipe.transformer = transformer

    pipe.load_lora_weights(
        "lightx2v/Qwen-Image-Edit-2511-Lightning",
        weight_name="Qwen-Image-Edit-2511-Lightning-4steps-V1.0-bf16.safetensors"
    )

    pipe.enable_group_offload(
        onload_device=torch.device("cuda"),
        offload_device=torch.device("cpu"),
        offload_type="leaf_level",
        use_stream=True,
    )

    pipe.vae.enable_tiling()
    pipe.vae.enable_slicing()
    return pipe


MODEL_ID = "Qwen/Qwen-Image-Edit-2511"
CKPT_PATH = "./models/qwen-image-edit-2511-Q5_K_M.gguf"

SYSTEM_PROMPT = """
### SYSTEM PROMPT ###

You are a specialized AI assistant that excels at digitizing, refining, and coloring hand-drawn line art. Your primary function is to transform a provided monochrome, hand-drawn sketch (input image) into a finished, polished illustration while strictly maintaining the original composition and lines. The coloring style must be that of professional Copic markers.

### INPUT PROCESSING AND REFINEMENT:
1.  Analyze the provided monochrome input image. Maintain all lines, forms, and details of the original drawing.
2.  Refine the line art: enhance the hand-drawn lines. They should remain visible, but become cleaner, crisp, and slightly darkened to create a solid foundation for coloring. Preserve the unique character of the original ink or pencil lines. Ensure any sketchy areas or unintended noise are removed, but the artistic intent is preserved.
3.  The refined line art must be the primary structure of the final output.

### COLORING (COPIC MARKER STYLE):
1.  Apply coloring to all appropriate areas, using a specific Copic marker style.
2.  Simulate the appearance of Copic ink:
    *   **Translucency:** Colors should be translucent, not opaque.
    *   **Layering:** Where colors overlap, they should darken or create a new shade, mimicking physical ink layering.
    *   **Feathering and Gradients:** Create smooth, intentional gradients and feathering. Avoid flat, solid color fills. Use variations in saturation and value within a single color area to show pen pressure and ink flow.
    *   **Blending:** Colors should blend seamlessly where they meet.
    *   **Edge Details:** Pay attention to the edges of colored areas. In Copic style, the color often doesn't stop perfectly at the line but might have slight bleeding or pooling, giving it an organic feel. Add these subtle details without overwhelming the line art.
3.  The overall palette should be vibrant, fresh, and professional, characteristic of a high-end marker illustration.

### OVERALL FINISHING:
1.  Ensure the paper texture of a high-quality illustration board is visible in the final image, with the ink applied.
2.  The colored lines should feel integrated, not just overlayed.
3.  The final illustration must look like a complete, professional marker drawing.
"""

@dataclass
class InputData:
    model_id: str
    ckpt_path: str
    prompt: str
    image_file: str


def edit_image(it: InputData) -> Image.Image:
    image = Image.open(it.image_file).convert("RGB")
    image = image.resize((512, 512))

    torch.cuda.empty_cache()

    transformer = create_transformer(it.model_id, it.ckpt_path)
    pipe = create_pipe(it.model_id)

    prompt_embeds, prompt_embeds_mask = precompute_embeds(pipe, it.prompt)

    pipe = swap_to_transformer(pipe, transformer)

    result = pipe(
        image=[image],
        prompt_embeds=prompt_embeds,
        prompt_embeds_mask=prompt_embeds_mask,
        negative_prompt=None,
        true_cfg_scale=1.0,
        num_inference_steps=4,
        generator=torch.Generator(device="cuda").manual_seed(0),
    )

    return result.images[0]


def main():
    parser = argparse.ArgumentParser(description="Qwen-Image-Edit CLI")
    parser.add_argument("input_image", help="input image file path")
    parser.add_argument("output_image", help="output image file path")
    args = parser.parse_args()

    inputData = InputData(
        model_id=MODEL_ID,
        ckpt_path=CKPT_PATH,
        prompt=SYSTEM_PROMPT,
        image_file=args.input_image
    )

    output_image = edit_image(inputData)
    output_image.save(args.output_image)
    print(f"saved: {args.output_image}")

if __name__ == "__main__":
    main()
VRAM 節約ポイント
qwen-image-edit-2511-Q5_K_M.gguf はそれ自体が 15GB あるので、 16GB VRAM の GPU で動かすのにはほんとうにギリギリ。
入力画像(参照画像)を 512x512 にリサイズして投入:
image = image.resize((512, 512))
create_pipe 関数内でパイプラインを組み立てるときに transformer=None にしておく:
    # transformer なしでパイプラインを組み、先にエンコードだけ済ませる
    pipe = QwenImageEditPlusPipeline.from_pretrained(
        model_id,
        transformer=None,          # まだ載せない
        text_encoder=text_encoder,
        torch_dtype=torch.bfloat16,
    )
このように pipe を組み立てておいて precompute_embeds 関数でテキスト(ここではシステムプロンプト)をエンコードするときに GPU を使うのだが、 その処理が終わったら、GPU の VRAM をいったん空にしておく。
えっと、つまり、テキストのエンコーダー用のデータをVRAMに乗せたまま画像の transformer 処理も行おうとすると out of memory になる、ということ。
以前は pipe.enable_model_cpu_offload() を使って VRAM を節約していたが、 それに替えて group_offload というさらに VRAM を節約できる(らしい)方法を使う:
    pipe.enable_group_offload(
        onload_device=torch.device("cuda"),
        offload_device=torch.device("cpu"),
        offload_type="leaf_level",
        use_stream=True,
    )
などの工夫によりなんとか Q5_K で out of memory を回避できた。
変換時間はおおよそ ひとつの画像処理で 2分 程度でした。
かきかけです。